What a Deposit Slip Is and Why You Need One
A deposit slip is a small paper form you complete to deposit money , cash, checks, or both , into your checking or savings account. The slip tells the bank your account number, how much you are depositing, and how the deposit is broken down between cash and individual checks.
You may also find this useful: cheap business deposit slips.
Without a completed deposit slip, a bank teller cannot process your deposit. The slip becomes the bank's official record of the transaction. When you fill one out correctly, your deposit posts to the right account for the right amount without delays.
Most banks give you a few deposit slips when you open an account. Businesses that make daily or weekly deposits quickly run through those starter slips. That is where pre-printed deposit slips ordered in advance become important , they have your account information already on them and keep your deposit process fast and error-free.
Every Field on a Deposit Slip Explained
Standard deposit slips have the same fields regardless of which bank issues them. Here is what each one means and what to write.
Date
Write today's date in month/day/year format. Use the date you are making the deposit, not the date the checks were written. This matters for bank reconciliation and for tracking when funds become available under Regulation CC.
Name
Your name or business name as registered with the bank. On pre-printed deposit slips, this is already printed for you. On blank slips, write it in the name field. The name must match the account exactly as the bank has it on file.
Account Number
Your checking or savings account number. On pre-printed slips, this is pre-printed and you skip this step. On blank slips, copy the account number exactly from an existing check or your bank statement. A single wrong digit sends your deposit to the wrong account. Double-check every digit before handing the slip to the teller.
Cash
The total dollar value of all bills and coins you are depositing. Count your cash before you arrive at the bank. Write the total in the cash field, not each bill denomination separately. If you have both bills and coins, count them together and write one combined cash total. If you are not depositing any cash, leave this field blank or write zero.
Checks (Individual Lines)
Each check gets its own line on the deposit slip. Write the dollar amount of each check in the amount column on the right side. Most deposit slips have two to five check lines on the front. If the slip has a check identification column on the left, write the fractional routing number from the upper right corner of each check , a number that looks like 12-3456/7890. This helps the bank identify which check belongs to which entry if there is a question later.
Subtotal
The sum of all your cash and check amounts combined. Add every line on the deposit slip and write the total in the subtotal field. This is not your final deposit amount , it is the total before any cash back is subtracted.
Less Cash Received
The amount of cash you want back from the deposit. If you want none, leave this blank. If you want $50 back, write $50 here. This amount is subtracted from your subtotal to give you the net deposit. When you take cash back, you must sign the deposit slip.
Net Deposit (Total)
The actual amount going into your account. This equals your subtotal minus any cash back. If you are not taking cash back, your net deposit equals your subtotal. Write this amount in the net deposit or total field. This is the number that will appear in your account as the deposit amount.
Signature
Sign only when you are taking cash back from the deposit. Your signature authorizes the bank to give you cash while depositing the remainder. If you are not taking cash back, do not sign the deposit slip. The teller will remind you if you forget.
How to Fill Out a Deposit Slip Step by Step
Follow these steps in order. Do not skip ahead or fill fields out of sequence , the math builds from top to bottom.
Step 1: Write the Date
Write today's date in the date field at the top of the slip. Use the format MM/DD/YYYY. If you are at the bank on August 14, 2026, write 08/14/2026. Banks use this date to timestamp the transaction and apply the correct fund availability schedule under Regulation CC.
Step 2: Confirm or Write Your Account Number
If you are using a pre-printed deposit slip from Checkomatic, your account number is already on the slip. Skip this step. If you are using a blank slip from the bank, copy your account number from the bottom of one of your checks. The account number is the middle number in the MICR line at the very bottom of your check. Write it exactly , no spaces, no dashes, no approximations.
Step 3: Count and Enter Your Cash
Count your bills and coins before stepping up to the teller window. Enter the combined total in the cash field. If you have no cash to deposit, write 0.00 or leave the field blank depending on the slip's format. Tellers count cash again after you hand it over, but having your count ready speeds up the process.
Step 4: List Each Check Separately
Take each check you are depositing and write its amount on a separate line on the deposit slip. Write the dollar amount in the right column. If there is an identification column, write the fractional routing number from the upper right corner of each check. Keep checks in the same order as you listed them on the slip , this helps the teller verify amounts quickly.
Step 5: Calculate the Subtotal
Add your cash amount and all individual check amounts together. Write that total in the subtotal field. Check your math twice before moving on. A wrong subtotal produces a wrong net deposit, which creates a discrepancy the bank will catch and you will have to resolve.
Step 6: Fill in Less Cash Received (Only If Needed)
If you want cash back from the deposit, write that amount in the less cash received field. If you are depositing everything with no cash back, leave this field blank or write 0.00. Do not guess , decide exactly how much cash you want before you write it here.
Step 7: Calculate and Write the Net Deposit
Subtract your less cash amount from your subtotal. Write the result in the net deposit or total field. If you are taking no cash back, your net deposit equals your subtotal exactly. This final number is what your bank will post to your account.
Step 8: Sign the Slip (Only If Taking Cash Back)
Sign the deposit slip in the signature field only if you entered an amount in the less cash received field. Your signature authorizes the bank to give you cash while depositing the balance. If you are not taking cash back, do not sign.
Step 9: Hand the Slip to the Teller With Your Deposit
Give the completed deposit slip, your cash (organized by denomination), and your endorsed checks to the teller. The teller verifies everything, processes the deposit, and gives you a receipt. Keep the receipt until the deposit appears on your bank statement and you have confirmed the amount is correct.
How to Fill Out a Deposit Slip With Multiple Checks
Most deposit slips have two to five check lines on the front. If you are depositing more checks than there are lines, here is how to handle it.
Using the Back of the Deposit Slip
Most deposit slips have additional check lines printed on the back for overflow. List your remaining checks on the back, writing the amount of each check on a separate line. Add all the check amounts on the back together and write the subtotal at the bottom of the back side.
Transferring the Back Total to the Front
On the front of the slip, find the field labeled "checks from back," "total from reverse," or similar. Write the back subtotal in this field. Now add the front cash, any front check lines, and the back total together to get your overall subtotal. Continue with steps 6 through 9 as normal.
What the Less Cash Received Section Means
The "less cash received" field (also printed as "less cash," "cash back," or "less cash back" depending on the bank) is the most misunderstood section on a deposit slip. Many people skip it or fill it in incorrectly.
When to Use It
Use the less cash received field when you want to receive some cash back from your deposit at the same time. For example, if you are depositing $800 worth of checks and want $100 in cash for petty cash, you write $100 in the less cash received field and $700 in the net deposit field. The bank gives you $100 in cash and deposits $700 into your account.
When to Leave It Blank
Leave the less cash received field completely blank when you are depositing everything with no cash back. Some people write $0.00 here thinking they need to fill every field. That is not necessary. A blank field means no cash back requested.
Why You Must Sign When Taking Cash Back
When you enter an amount in the less cash received field, you are authorizing a simultaneous deposit and cash withdrawal. Your signature in the signature field confirms that authorization. The bank keeps your signed slip as proof. If you do not sign when taking cash back, the teller will ask before processing.
Blank vs Pre-Printed Deposit Slips
Banks give you blank deposit slips at the counter. They work, but they require you to handwrite your full account number and name on every single slip before you can use it. For occasional personal deposits, that is manageable. For business deposits, it is slow and creates room for errors.
Blank Deposit Slips
Available at any bank counter. You fill in every field including your name and account number each time. Useful in an emergency or when you run out of pre-printed slips. The risk is account number errors , one transposed digit sends the deposit to the wrong account.
Pre-Printed Deposit Slips
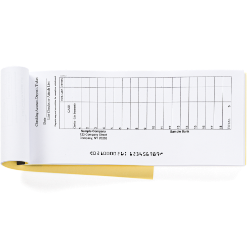
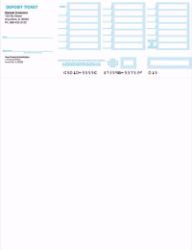
Come with your name, bank name, routing number, and account number already printed on every slip. You fill in only the transaction-specific fields: date, cash, individual checks, and totals. Faster to complete. Less risk of account number errors. Available in padded book format (approximately 60 slips per book) or loose sheet format for businesses that process deposits through a printer or machine.
Common Deposit Slip Mistakes and How to Avoid Them
Mistake 1: Wrong Account Number
Writing one digit of your account number incorrectly on a blank deposit slip can deposit your money into someone else's account. The bank catches this during processing but correcting it takes time and documentation. Solution: use pre-printed deposit slips where the account number is already on the slip, or copy your account number directly from the bottom of an existing check rather than from memory.
Mistake 2: Adding Cash and Check Lines Incorrectly
Math errors in the subtotal field create discrepancies the teller catches during verification. This delays your deposit and requires you to re-complete the slip. Solution: add your cash and check amounts on a separate piece of paper or a calculator before writing the subtotal, then transfer the verified total.
Mistake 3: Forgetting to List Checks on Separate Lines
Combining multiple checks into one line entry makes it impossible for the bank to match individual checks to individual entries if a question arises later. Always list each check on its own line with its specific amount.
Mistake 4: Signing When Not Taking Cash Back
Signing a deposit slip when you are not taking cash back does not invalidate the deposit, but it can cause confusion. The teller may ask whether you meant to request cash. Leave the signature line blank on straight deposits with no cash back.
Mistake 5: Not Endorsing Checks Before Depositing
Handing an unendorsed check to a teller creates a delay while you endorse it at the window. Banks require endorsement before accepting a check for deposit. Endorse all checks before you leave your office or car. Write "For Deposit Only" and your account number in the endorsement area on the back of each check.
Mistake 6: Leaving the Net Deposit Field Blank
Some people fill in the subtotal but forget to complete the net deposit field. The teller can calculate it, but leaving it blank slows down processing. Always complete the net deposit field before handing the slip over.
What to Do After Filling Out a Deposit Slip
Get Your Receipt and Verify It
The bank gives you a printed receipt when your deposit is processed. Before you leave, check that the account number, deposit date, and net deposit amount on the receipt match what you wrote on the slip. If anything looks wrong, address it at the teller window immediately , not two days later when the statement posts.
Record the Deposit in Your Check Register
Enter the deposit in your check register the same day. Write the date, the description (such as "deposit , checks from XYZ and ABC clients"), and the net deposit amount in the deposit column. Update your running balance. Waiting to record deposits creates the same balance accuracy problem as waiting to record checks. For the complete guide to maintaining an accurate check register, see check register: how to set up and use a checkbook ledger.
File Your Deposit Copy
If you used a 2-part or 3-part deposit slip, keep your carbon copy in a deposit file for the current month. Match it against your bank statement during monthly reconciliation. If a deposit amount on your statement does not match your copy, you have documentation to resolve the discrepancy. For the monthly reconciliation process, see checkbook management: how to balance and reconcile your account every month.
What Customers Say About Checkomatic
All reviews below are published on checkomatic.com and reproduced verbatim. Source: checkomatic.com/quickbooks-starter-pack-product, 4.5 stars from 166 verified reviews.
"Been with them for 15 years. Always reliable, always good quality, good service. What more can you ask for?"
ATV Inc. | ★★★★★ 5/5 | April 5, 2024 | Source: checkomatic.com/quickbooks-starter-pack-product
"We use CheckoMatic for all of our check needs! They have great prices and we receive our products in a timely manner!"
CG's Tax Service | ★★★★★ 5/5 | September 18, 2024 | Source: checkomatic.com/quickbooks-starter-pack-product
"I got 500 checks for less than half of what the bank wanted for 200!"
VVA Voucher Checks (Vietnam Veterans of America) | ★★★★★ 5/5 | July 6, 2024 | Source: checkomatic.com/quickbooks-starter-pack-product
"ASJ Wilson Construction has been a client of checkomatic for some years now and they've never disappointed this company. Thank you checkomatic for all that you do."
ASJ Wilson Construction | ★★★★★ 5/5 | June 6, 2024 | Source: checkomatic.com/quickbooks-starter-pack-product
"First time ordering and I am super impressed with the quality of the checks. No issues with delivery. I will be ordering again!"
TClinton | ★★★★★ 5/5 | April 9, 2025 | Source: checkomatic.com/quickbooks-starter-pack-product
"Affordable and efficient. My go-to business check printer."
Doe | ★★★★★ 5/5 | January 24, 2025 | Source: checkomatic.com/quickbooks-starter-pack-product
Why Choose Checkomatic for Pre-Printed Deposit Slips
Account Information Pre-Printed , No Manual Entry Needed
Every Checkomatic deposit slip ships with your business name, bank name, ABA routing number, and account number already printed on every slip. You fill in only the transaction-specific amounts: date, cash, checks, and totals. No handwriting your account number on every slip. No risk of transposing a digit and sending your deposit to the wrong account.
Three Formats for Every Business Need
1-part slips for simple deposits where the bank receipt is your only record. 2-part (duplicate) slips where you keep a carbon copy for your accounts receivable file. 3-part (triplicate) slips for businesses that track deposits across multiple departments or properties. All three formats are available at business deposit slips.
Book and Loose Sheet Options
Padded book format (approximately 60 slips per book) keeps your deposit supply organized and protected. Loose sheet format works for businesses that run deposit slips through a printer or processing machine. Both formats include your pre-printed account information on every slip.
QuickBooks-Compatible Deposit Slips
For businesses using QuickBooks for accounts receivable, Checkomatic's QuickBooks-compatible deposit slips record up to 18 entries per slip and are formatted to match QuickBooks deposit templates. No alignment adjustments needed. See QuickBooks deposit slips for full details.
In-House Manufacturing Since 1997
All deposit slips are manufactured at Checkomatic's own facility in Monroe, NY. Standard production ships in 3 to 5 business days. To bundle deposit slips with business checks, envelopes, and an endorsement stamp in a single order, see the business check starter kit.