Quick Answer: Xero compatible business checks are pre-printed check stock that aligns with Xero's Bills to Pay check printing template. Your company name, bank details, and MICR-encoded routing and account numbers are pre-printed. When you run a check print job in Xero, the software outputs the payee name, amount, date, and check number to the correct positions on the sheet. Checkomatic manufactures Xero compatible checks in check-on-top, check-in-middle, check-on-bottom, and 3-on-a-page formats, all working with Xero's print workflow without alignment adjustments.
How Xero Check Printing Works
Xero's check printing feature is built into the Bills to Pay module. When you are ready to pay a batch of vendor bills by check, you select the bills, choose to pay by check, and Xero generates a print-ready PDF. That PDF contains all the variable information for each check: payee name, dollar amount in numbers and words, date, check number, and memo. The PDF is formatted to match a specific check stock layout.
Your job is to load the right check stock into your printer and print the PDF. Xero does the variable field output. The check stock does the rest: your pre-printed company name, bank name, routing number, and account number appear in the correct positions because they were printed on the stock before it arrived.
The critical requirement is that the check stock layout must match Xero's PDF template exactly. Xero outputs fields to specific coordinate positions on the sheet. If the check is not in the position the template expects, the payee name, dollar amount, and date all print in the wrong locations. The result is unusable paper that cannot be signed or mailed.
What Gets Pre-Printed vs What Xero Fills In
Understanding the division between pre-printed and Xero-printed information helps you order correctly and troubleshoot any print run issues.
| Pre-Printed at Checkomatic | Xero Fills In at Print Time |
|---|---|
| Your company name and address | Payee name (vendor or employee) |
| Your bank name | Dollar amount in numbers (convenience amount) |
| ABA routing number | Dollar amount in words (legal line) |
| Checking account number | Check date |
| MICR line (ABA-certified magnetic ink) | Check number (sequential) |
| Your business logo (free B&W or color add-on) | Memo / reference line |
| Security features (in the paper) | Stub remittance detail (invoices paid, amounts) |
When you receive your Checkomatic Xero compatible check order, every check in the supply already has your company's static information printed on it. No manual writing. No setup. Load the paper, open Xero's Bills to Pay module, select your bills, and print.
The Four Xero Compatible Check Formats
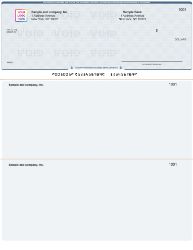
Xero compatible check on top from Checkomatic , the most commonly ordered format for Xero AP workflows, with two stubs below the check for vendor and payer records.
Checkomatic manufactures four Xero compatible check formats. All four work with Xero's Bills to Pay check printing workflow. The difference is where the check is positioned on the 8.5 x 11 inch sheet, which must match Xero's configured print template.
Xero Check on Top
The Xero check on top format places the check in the upper third of the sheet with two perforated stubs below it. One stub goes to the vendor as a payment confirmation and remittance record. The other stays in your files as your AP copy. Check on top is the most commonly ordered format for Xero users and the default layout for most Xero AP check printing setups. For the Xero check-on-top format, see Xero check on top.
Xero Check in Middle
The Xero check in middle format centers the check on the sheet with one stub above and one below. This layout is used in Xero configurations where equal stub space on both sides is required, or where a specific AP workflow expects the check-in-middle template. For the Xero check-in-middle format, see Xero check in middle.
Xero Check on Bottom
The Xero check on bottom format positions the check at the foot of the sheet with both stubs running above it. Payroll-heavy operations sometimes prefer this layout because the earnings or payment detail appears at the top of the sheet when the recipient opens the envelope, making the remittance information the first thing they see before detaching the check. For the Xero check-on-bottom format, see Xero check on bottom.
Xero 3-on-a-Page
The Xero 3-on-a-page format places three separate checks on one sheet with no stubs. All transaction records stay inside Xero rather than on a physical stub. High-volume AP departments and accounting practices managing multiple client accounts use this format to reduce paper cost per check payment. It is not suitable for payroll or for vendor payments requiring physical remittance documentation. For the Xero 3-on-a-page format, see Xero 3 on a page.
Which Xero Check Format Should You Order?
The format you order must match the Xero print template your account is configured to use. This is not a preference. If the check position does not match Xero's template coordinates, every field the software outputs will land in the wrong location on the sheet. The check will be unusable.
How to Find Your Xero Check Format
- Log in to Xero and navigate to the Bills to Pay module.
- Select any bill and choose the option to pay by check.
- Open the print preview for the check PDF that Xero generates.
- Observe where the payee name, date, and dollar amount appear in the preview: upper third of the page = check on top; center = check in middle; lower third = check on bottom; three per page = 3-on-a-page.
- Order the format that matches this preview exactly.
For a complete comparison of all three check position formats and which accounting platforms use each, see check on top vs check in middle vs check on bottom: which format you need.
Xero Check Format Comparison Table
| Format | Check Position | Stubs | Best for | Checkomatic |
|---|---|---|---|---|
| Check on Top | Upper third | 2 below check | AP vendor payments, payroll | Xero check on top |
| Check in Middle | Center | 1 above, 1 below | Workflows needing equal stub space | Xero check in middle |
| Check on Bottom | Lower third | 2 above check | Payroll, stub-first presentation | Xero check on bottom |
| 3-on-a-Page | 3 checks per sheet | No stubs | High-volume AP, accounting firms | Xero 3 on a page |
Common Mistakes With Xero Check Printing
Ordering the Wrong Format
The most common mistake is ordering check on top stock when Xero is configured for a different layout. Because check on top is the default for most AP setups, many businesses assume it is always correct. Before ordering, always verify your Xero print template by running a preview in the Bills to Pay module. If your Xero account was configured by an accountant or bookkeeper, confirm with them which template is active before placing an order.
Assuming All Checks Are Interchangeable
Some businesses order generic computer checks thinking any check-on-top format will work with Xero. Xero compatible checks must be formatted to Xero's specific template dimensions and field positions. Checkomatic's Xero compatible checks are pre-formatted to align with Xero's output without manual adjustment. Generic check stock that is not pre-formatted to Xero's template may require printer alignment adjustment for every print run.
Not Testing Before Bulk Ordering
Ordering 500 or 1,000 checks without a test print first is a risk that costs more than the test would have. A single test page on plain white paper, held over a blank Checkomatic check, confirms alignment in under one minute. This one step eliminates the most expensive mistake in Xero check printing.
Printing MICR Toner Unnecessarily
Some businesses who have previously used blank check stock assume they need MICR toner to print Xero checks. Checkomatic's Xero compatible checks arrive with the MICR line pre-printed using ABA-certified MICR ink. Your standard laser or inkjet printer handles Xero's variable output only. MICR toner is not needed and adding it unnecessarily doubles print complexity without benefit.
For more detail, see what laser business checks are.
How to Verify Your Xero Format Before Ordering
- Run a Xero check print preview: Log into Xero, go to Bills to Pay, select any bill, and choose to print a check. Open the PDF preview. This shows exactly where Xero outputs each field on the sheet.
- Print on plain white paper: Print one test check on plain white 8.5 x 11 paper from your standard printer.
- Check the position: Look at where the payee name and dollar amount printed. Upper third = check on top. Center = check in middle. Lower third = check on bottom. Three per page = 3-on-a-page.
- Order the matching format: Order the Checkomatic Xero compatible format that matches your test result. Browse all formats at Xero compatible checks.
- Run a second test: When your Checkomatic checks arrive, print one check on a single sheet from your order. Confirm all fields align correctly before printing the full batch.
For the complete format comparison across all major accounting platforms, see software compatible business checks.
Security Features on Xero Compatible Checks
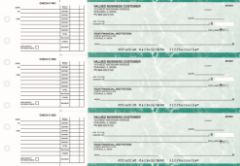
Xero compatible AP checks from Checkomatic , all security features included on every order as standard, accepted at all major US banks.
Every Xero compatible check from Checkomatic includes the following security features built into the check paper as standard:
- Microprinting along the signature line: Appears as a thin line but is actually tiny repeating text. Blurs on any photocopy, which bank fraud detection systems flag as a reproduction.
- Heat-sensitive ink: A small element on the check disappears when pressed with a warm thumb. Bank tellers use this as an authenticity test.
- Chemical-reactive paper: The check paper stains visibly when exposed to bleach or solvent, revealing any check washing attempt before the bank processes the check.
- Void pantograph: A background pattern that causes VOID to appear clearly when the check is photocopied or scanned, deterring counterfeiting.
- True watermark: Visible from both sides when held to light. Authentic paper, not printed reproduction.
- Coin-reactive ink: Changes color when the check surface is rubbed with a coin or hard metal object. A quick teller authenticity test.
All security features meet ABA specifications. Every Xero compatible check from Checkomatic is accepted at all major US banks. For the complete guide to check security features and which matter most for fraud prevention, see are business checks safe: security features that actually matter.
How to Order Xero Compatible Checks From Checkomatic
What You Need Before Ordering
- Your ABA routing number: Nine digits from the lower-left of the MICR line on an existing check, or from your bank's online portal.
- Your checking account number: The center digits in the MICR line at the bottom of an existing check.
- Your starting check number: One higher than the last check you used. This keeps your sequential numbering intact for bookkeeping and Xero reconciliation.
- Your business name and address: Exactly as registered with your bank. Mismatches between the check and bank records can create verification delays.
- Your logo file (optional): Black and white logo printing is free on every Checkomatic order. Color logo printing is available for a small additional fee.
- Your confirmed Xero format: Verified using the test print method above before ordering.
What Comes with Every Xero Check Order
- Your company name, address, and banking details pre-printed
- Your business logo in black and white at no extra charge
- 20 background color and style options across diamond, marble, and prismatic textures
- All security features as standard: microprinting, heat-sensitive ink, chemical-reactive paper, void pantograph, watermark, coin-reactive ink
- ANSI E13-B certified MICR encoding pre-printed and verified
- Laser and inkjet printer compatibility
You can pair your Xero compatible checks with double-window check envelopes and business deposit slips on the same order. Browse all Xero formats at Xero compatible checks.
What Customers Say About Checkomatic
All reviews below are published on checkomatic.com and reproduced verbatim. Source: checkomatic.com/quickbooks-starter-pack-product, 4.5 stars from 166 verified reviews.
"Been with them for 15 years. Always reliable, always good quality, good service. What more can you ask for?"
ATV Inc. | ★★★★★ 5/5 | April 5, 2024 | Source: checkomatic.com/quickbooks-starter-pack-product
"First time ordering and I am super impressed with the quality of the checks. No issues with delivery. I will be ordering again!"
TClinton | ★★★★★ 5/5 | April 9, 2025 | Source: checkomatic.com/quickbooks-starter-pack-product
"We use CheckoMatic for all of our check needs! They have great prices and we receive our products in a timely manner!"
CG's Tax Service | ★★★★★ 5/5 | September 18, 2024 | Source: checkomatic.com/quickbooks-starter-pack-product
"I got 500 checks for less than half of what the bank wanted for 200!"
VVA Voucher Checks (Vietnam Veterans of America) | ★★★★★ 5/5 | July 6, 2024 | Source: checkomatic.com/quickbooks-starter-pack-product
"ASJ Wilson Construction has been a client of checkomatic for some years now and they've never disappointed this company. Thank you checkomatic for all that you do."
ASJ Wilson Construction | ★★★★★ 5/5 | June 6, 2024 | Source: checkomatic.com/quickbooks-starter-pack-product
"Affordable and efficient. My go-to business check printer."
Doe | ★★★★★ 5/5 | January 24, 2025 | Source: checkomatic.com/quickbooks-starter-pack-product
Why Choose Checkomatic for Xero Compatible Business Checks
Pre-Formatted for Xero , No Alignment Adjustments
Checkomatic has manufactured Xero compatible checks from Monroe, NY since 1997. Every format on the Xero product range is pre-formatted to align with Xero's Bills to Pay print template. Load the paper, run the print job in Xero, sign, and mail. No adjustments, no test runs consuming your check supply, no format mismatches on your first AP batch. For all four Xero formats, see Xero compatible checks.
MICR Pre-Printed , Standard Toner Only
The MICR line on every Checkomatic Xero check is pre-printed using ABA-certified MICR ink and verified before shipping. Your standard office laser or inkjet printer handles Xero's variable output only. No MICR toner, no special printer, no complex setup.
All Security Features Standard
Every Xero compatible check from Checkomatic includes the full standard security feature set at the base price: microprinting, heat-sensitive ink, chemical-reactive paper, void pantograph, true watermark, and coin-reactive ink. These are not optional upgrades. They are on every check in every order.
500+ Accounting Platforms Supported
If you use multiple accounting platforms, or if your Xero configuration changes and you need a different format, Checkomatic supports over 500 accounting software platforms. For the complete software compatibility overview, see software compatible business checks.